Public registry app
The Stacks Blockchain API is an API that helps app developers to view and use the state of the Stacks blockchain.
In this tutorial you will extend the To-dos app to share individual lists publicly using the Stacks blockchain.
The registry of shared to-dos lists is implemented by a Clarity smart contract named todo-registry. Data from this contract will be shown in the to-dos app.
The final app will look like this:
By the end of this tutorial, you will have:
- Observed transactions while they are added to the blockchain
- Consumed APIs to show recent transactions, data map entries and read-only functions
- Experienced serializing and deserializing Clarity values
Prerequisites#
Check testnet status#
To make sure you're not running into any challenges related to our network, please open up the Status Checker and confirm that all systems are operational. If some systems seem to have issues, it is best to wait until they are back up before you proceed with the next steps.
Furthermore, the to-dos app will interact with a smart contract deployed as ST1234....todo-registry. The contract source code is available at GitHub.
There may already be a deployed version available on the testnet; the Stacks Explorer can be used to search for it.
Alternatively, the contract can be deployed as described in the hello world tutorial. Then you have to use the corresponding contract address and name in this tutorial. Throughout this tutorial, we use ST3YPJ6BBCZCMH71TV8BK50YC6QJTWEGCNDFWEQ15.todo-registry as an example.
Tutorials#
You should have followed the instructions of the to-dos app tutorial. You should have the code ready on your local machine. It is also helpful to have a basic understanding of Clarity as explained in the counter tutorial. If you are using mocknet or a new, empty testnet you can create transactions following the tutorial about signing transactions.
Check your to-dos app#
In your code repository of the to-dos app, launch the app by running the start command.
npm run startIn your browser, you should see the to-dos app.
Registering a public URL#
The Connect library (that is already used for authentication in the to-dos app) provides also methods to create, sign and broadcast transactions to the Stacks blockchain as explained in the signing transaction tutorial.
Step 1: Define contract#
The contract was already written and deployed to the blockchain. Its address and name is used often in the tutorial and therefore define some constants in the constants.js file by adding the following two lines:
// src/assets/constants.jsxexport const CONTRACT_ADDRESS = "ST3YPJ6BBCZCMH71TV8BK50YC6QJTWEGCNDFWEQ15";export const CONTRACT_NAME = "todo-registry";Step 2: Create registration component#
The user needs a UI component to conveniently create register transactions on the chain.
The contract function register takes two arguments:
(define-public (register (name (buff 30)) (url (buff 255))) ...)Create a new filed named PublicUrlRegistrar.jsx in the src/components folder and add the PublicUrlRegistrar component:
// src/components/PublicUrlRegistrar.jsximport React from "react";import { Text } from "@blockstack/ui";import { useConnect } from "@stacks/connect-react";import { bufferCVFromString } from "@stacks/transactions";import { CONTRACT_ADDRESS, CONTRACT_NAME } from "../assets/constants";
export const PublicUrlRegistrar = ({ userSession }) => {  const { doContractCall } = useConnect();  const { username } = userSession.loadUserData();  const url = `${document.location.origin}/todos/${username}`;
const register = () => { // do the contract call doContractCall({ contractAddress: CONTRACT_ADDRESS, contractName: CONTRACT_NAME, functionName: "register", functionArgs: [bufferCVFromString(username), bufferCVFromString(url)], onFinish: (data) => { console.log({ data }); }, }); }; return ( <> <Text color="blue" cursor="pointer" fontSize={1} fontWeight="500" onClick={() => { // register the public URL register(); }} > Register on-chain </Text> </> );};It is a simple button that calls doContractCall method of the Connect library when clicked. The method makes an api call to the Stacks authenticator. The authenticator creates a contract call transaction that is signed by the user and then it is broadcast to the Stacks blockchain as explained in the transaction signing tutorial.
Note how the arguments are created using bufferCVFromString. There are similar methods for all other Clarity types, like uintCV or trueCV. See the documentation of the stacks-transactions library for more details.
Step 3: Integrate the component in the app#
To use the PublicUrlRegistrar component, open Sharer.jsx and add the following lines after the Copy Link text component of the Sharer component:
// src/components/Sharer.jsx<PublicUrlRegistrar userSession={userSession} />Now, you should be able to register your public to-dos list on the blockchain when you click on "Register on-chain."

Waiting for transactions#
The method doContractCall has a callback onFinish that is called after the user confirmed the transaction. This does not mean that the blockchain has accepted and included the transaction on the blockchain. It just means that the transaction was broadcasted to the network. The transaction id is returned in the onFinish callback as data.txId. This id can be used to find the transaction and its processing status on the blockchain. The Stack Blockchain API client library provides a convenient method to subscribe to the progress using web sockets.
Step 1: Add dependency#
Add the Stacks Blockchain API client library to package.json in the root folder of the to-dos list app:
npm add @stacks/blockchain-api-clientStep 2: Store the transaction ID#
Create a react state variable in the PublicUrlRegistrar component that holds the transaction id.
// src/components/PublicUrlRegistrar.jsx
const [txId, setTxId] = useState();and set the value in the onFinish callback
// src/components/PublicUrlRegistrar.jsx
onFinish: data => { console.log(data); setTxId(data.txId); },Step 3: Connect to web socket#
Add an import for connectWebSocketClient:
import { connectWebSocketClient } from "@stacks/blockchain-api-client";Then subscribe for updates of the transaction status by creating a web socket client using connectWebSocketClient. Add a call to client.subscribeTxUpdates with the transaction id txId and a callback function. This callback function is called whenever the transaction status changes. The subscribe process needs to be done only once at the start of the app. Therefore, add it into an effect hook that only depends on the txId.
useEffect(() => { let sub; const subscribe = async (txId) => { const client = await connectWebSocketClient( "ws://stacks-node-api.blockstack.org/" ); sub = await client.subscribeTxUpdates(txId, (update) => { console.log(update); }); console.log({ client, sub }); }; subscribe(txId);}, [txId]);You will see update logs in the console. The received object is a transaction status object and has a tx_status property. If the status is success the transaction was processed and added to the blockchain.
Reading the registration details#
Now that the transaction was processed successfully, you can read information about a transaction, in particular, the registry id that was returned by the transaction. The id (registry-id) is an unsigned integer.
(define-public (register ...) ... (ok registry-id))This information should be shown in a new Transaction component using the TransactionsApi object provided by the client library.
Step 1: Create a component representing the register transaction#
Create a new file Transaction.jsx in folder src/components and add the following lines:
import React, { useCallback, useEffect, useState } from "react";import { Text } from "@blockstack/ui";import { TransactionsApi } from "@stacks/blockchain-api-client";
export const Transaction = ({ txId }) => {  const [transactionDetails, setTransactionDetails] = useState();
  const fetchTransactionDetails = useCallback(async () => {    // fetch transaction from api  }, [txId]);
  useEffect(() => {    void fetchTransactionDetails();  }, [fetchTransactionDetails]);
return transactionDetails ? ( <Text fontWeight="500" display="block" mb={0} fontSize={2}> Registration: TODO </Text> ) : null;};Step 2: Use TransactionsApi#
Information about transactions can be retrieved using the TransactionsApi object. Add a definition to the top of the Transaction.jsx file:
const transcationsApi = new TransactionsApi();note
The constructor takes a configuration argument. It can be used to set the server URL. By default, it is the URL for the node hosted by Hiro PBC.
Then in the fetchTransactionDetails method add a call to getTransactionById. The result is detailed data about the transaction: the status, when it was created, the type, the contract call details, the transaction result and many more.
// fetch transaction from apiif (txId) { const txDetails = await transcationsApi.getTransactionById({ txId }); setTransactionDetails(txDetails);}Step 3: Display transaction details#
The text of the transaction details can now be updated with real data. Replace the "TODO" with some result data. For now, let's just show the JSON. Handling Clarity values properly is show in the next section.
<Text fontWeight="500" display="block" mb={0} fontSize={2}> Registration: Result {JSON.stringify(transactionDetails.tx_result)}</Text>Step 4: Use transaction component#
To bring the pieces together, the Transaction component should be added to the app. For this, extend the PublicUrlRegistrar first so that it can hand over the transaction id when the register transaction was successfully processed.
Add a react state variable success after the txId state variable
// src/components/PublicUrlRegistrar.jsxconst [success, setSuccess] = useState();and set it to true in the update callback if then transaction update status is success
sub = await client.subscribeTxUpdates(txId, (update) => { console.log(update); setSuccess(update.tx_status === "success");});Finally, add the Transaction component at the end of the PublicUrlRegistrar component if the transaction was successfully processed.
{ success && <Transaction txId={txId} />;}You should now be able to see an update in the UI if the transaction was successfully added to the blockchain. In real apps, the progress status could be indicated by colors or other UI elements.
Show recent activities#
Similar to the TransactionApi, the AccountsApi provides easy access to account-related information. The API will be used in this section to show recent activities for the to-dos list registry.
Step 1: Create recent activities component#
Create a new file RecentActivities.jsx in folder src/components and add the following lines:
import React, { useCallback, useEffect, useState } from "react";import { Text } from "@blockstack/ui";import { AccountsApi } from "@stacks/blockchain-api-client";import { CONTRACT_ADDRESS, CONTRACT_NAME } from "../assets/constants";
const accountsApi = new AccountsApi();
export const RecentActivities = () => {  const [activities, setActivities] = useState();
  const fetchActivities = useCallback(async () => {    // fetch activities  }, []);
  useEffect(() => {    void fetchActivities();  }, [fetchActivities]);
  console.log({ activities });
return activities && activities.length > 0 ? ( <Flex display="block" position="absolute" bottom="0" width="100%" justifyContent="space-between" px={4} py={3} > <Box px={3} background="#efefef"> <Text fontWeight="500" display="block" mb={0} fontSize={3}> Public Todos List Registry </Text> <Text fontWeight="500" display="block" mb={0} fontSize={2}> Recent Activities:{" "} {activities.map((activity, key) => { <Text key={key}>{JSON.stringify(activity)}</Text>; })} </Text> </Box> </Flex> ) : null;};Next, add the following line to Apps.jsx after the SignIn and TodoList fragment:
<div className="site-wrapper-inner"> ... <RecentActivities /></div>Step 2: Use AccountsApi#
Now, add a call to the getAccountTransactions method. This method can be used for users and for contracts. It returns transactions that are related to the given account. The default is to return the last 20 transactions.
const fetchActivities = useCallback(async () => { // fetch activities const response = await accountsApi.getAccountTransactions({ principal: `${CONTRACT_ADDRESS}.${CONTRACT_NAME}`, }); console.log(response);}, []);info
For users, the principal argument is just the user's stacks address.
Step 3: Filter for successful contract calls#
Contract calls could fail with an error, for example if the public url is too long. The transactions should be filtered for successful contract calls:
const contractCallsOnly = (r) => { console.log(r); return r.tx_status === "success" && r.tx_type === "contract_call";};Then apply the filter to the response result and store it in the activities variable.
The final callback fetchActivities looks like this:
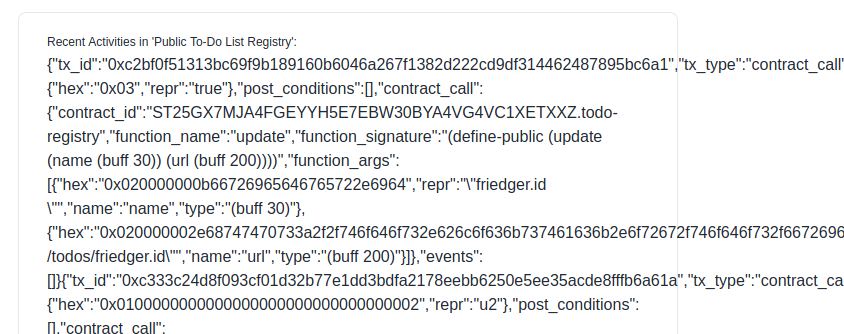
const fetchActivities = useCallback(async () => { // fetch activities const response = await accountsApi.getAccountTransactions({ principal: `${CONTRACT_ADDRESS}.${CONTRACT_NAME}`, }); console.log(response); setActivities(response.results.filter(contractCallsOnly));}, []);You should now see a list of hex strings representing the transactions.
Step 4: Extract registry IDs#
For the last step, the returned details need to be decoded and and formatted appropriately to be readable. The register function returns the transaction id as a result. As mentioned above, it is an unsigned int (uint) encoded as a hex string (tx_result.hex) like 0x0100000000000000000000000000000001. The method hexToCV decodes the string and creates a ClarityValue object. In this case it is an object of type UIntCV.
The client library defines types for all Clarity types. The corresponding type gives access to more properties. For example, UIntCV has a value property for its number value.
hexToCV(tx_result.hex).value;You can also use cvToString for a simple conversion of the ClarityValue object to a string
cvToString(hexToCV(tx_result.hex));Step 5: Display register details#
In addition to tx_result, the transaction object also contains a timestamp (burn_block_time_iso) and a contract_call object. The contract call object has properties like the function name (contract_call.function_name). Using this, the final representation for register transactions should contain the deserialized registry id and the timestamp. It could look like this:
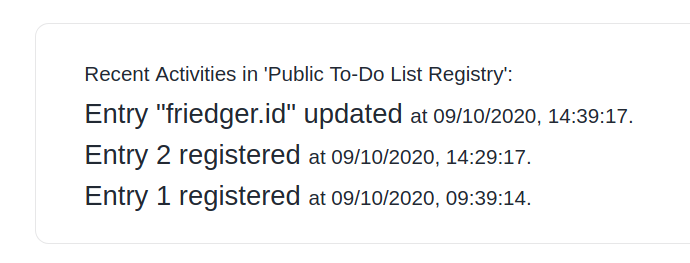
{ activities.map((activity, key) => { if (activity.contract_call.function_name === "register") { const result = hexToCV(activity.tx_result.hex.substr(2)); return ( <React.Fragment key={key}> Entry {result.value.toString()} was registered at{" "} {activity.burn_block_time_iso}.{" "} </React.Fragment> ); } else { return null; } });}note
The AccountsApi and other Api methods provide parameters to page through the results using limit and offset. See the docs for more details.
Congratulations. You just implemented a list of recent activities that was fetched from the blockchain.
Fetch the first to-dos list#
There are two other ways to get state information from the blockchain: read-only functions and data map entries. Read-only functions were already discussed in the Clarity counter tutorial. They do not require a transaction to complete. Data maps in Clarity are maps that can be read by any user. See the Clarity reference for more details.
The todo-registry contract defines a read-only function owner-of? that returns the owner of a registry entry and a data map for details about entries:
(define-read-only (owner-of (registration-id uint)) ... )
(define-map registry ((registry-id uint)) ( (name (buff 30)) (url (buff 255)) ))Let's add the owner information and the details for the first ever registered to-dos list (with registry-id 1) to the RecentActivities component. The SmartContractsApi of the client library provides methods to read these data from the blockchain.
Step 1: Add state variable for first registration#
At first, add a new state variable firstRegistration.
// src/components/RecentActvities.jsx
const [firstRegistration, setFirstRegistration] = useState();Then, define a new callback fetchRegistration that will contain the calls to the blockchain and update the state variable. Add the following code after the fetchRegistration callback and update the effect hook.
const fetchRegistration = useCallback(async () => {  // fetch newest registration  // fetch owner  // fetch public URL and name});
useEffect(() => { void Promise.all([fetchActivities(), fetchRegistration()]);}, [fetchActivities, fetchRegistration]);Step 2: Query owner of the first to-dos list#
To query the read-only functions of the smart contract, a SmartContractsApi object needs to be created, in the same way as the AccountsApi object.
const smartContractsApi = new SmartContractsApi();Use that api object in the fetchRegistration callback to call the read-only method owner-of? like this:
const fetchRegistration = useCallback(async () => { const ownerResponse = await smartContractsApi.callReadOnlyFunction({ contractAddress: CONTRACT_ADDRESS, contractName: CONTRACT_NAME, functionName: "owner-of?", readOnlyFunctionArgs: ReadOnlyFunctionArgsFromJSON({ sender: CONTRACT_ADDRESS, arguments: [cvToHex(uintCV(1))], }), }); console.log(ownerResponse);});The arguments of the read-only function are provided as an array of hex encoded ClarityValues.
The helper method cvToHex converts a ClarityValue into a hex encoded string. It is the reverse function of hexToCV that was used to decode the transaction response.
The sender can be any stacks address and is not relevant for the owner-of? function.
Step 3: Deserialize the response#
A read-only function call returns a response object with an okay property and it's true, it contains a result property with the hex encoded Clarity value. Otherwise the cause property describes the error. The helper methods hexToCV is used again to decode the result. The result is an optional address of type SomeCV. It has a property value that contains the owner address. Using cvToString with ownerCV.value returns the address as a string:
if (ownerResponse.okay) { const ownerCV = hexToCV(ownerResponse.result); const owner = cvToString(ownerCV.value);}Step 4: Fetch a map entry#
For the registry details, the data map registry of the contract can be queried to receive the username and the registered url. The method SmartContractsApi.getDataMapEntry method expects a hex encoded string representing the key. The map key always consists of a Clarity tuple. For the registry map, the only value of the tuple is the registry-id. Therefore, the hex string is created like this:
const key = cvToHex(tupleCV({ "registry-id": uintCV(1) }));With the encoded key, add the following lines to the fetchRegistry callback
const mapEntryResponse = await smartContractsApi.getContractDataMapEntry({ contractAddress: CONTRACT_ADDRESS, contractName: CONTRACT_NAME, mapName: "registry", key,});console.log({ mapEntryResponse });Step 5: Deserialized data map entry#
The response object has a property data that contains the hex encoded result. If the key was invalid the result is an object of type OptionalNone. Otherwise, the result is of type OptionalSome and its value property contains the map entry. It is always a tuple (type TupleCV). Its data property contains the registered name and public url as ClarityValues.
Therefore the deserialization of the result looks like this:
const optionalMapEntry = hexToCV(mapEntryResponse.data);
if (optionalMapEntry.type === ClarityType.OptionalSome) { const mapEntryCV = optionalMapEntry.value; const registryData = mapEntryCV.data;}Add this to the fetchRegistry callback and then update the react state variable with all the gathered data. Instead of using cvToString you can also access the buffer value directly and convert it to a string. This is useful for the url because cvToString put the string in quotes.
setFirstRegistration({ owner, name: cvToString(registryData.name), url: registryData.url.buffer.toString(),});Step 6: Display registry entry#
Update the UI to display the data of the first registry entry.
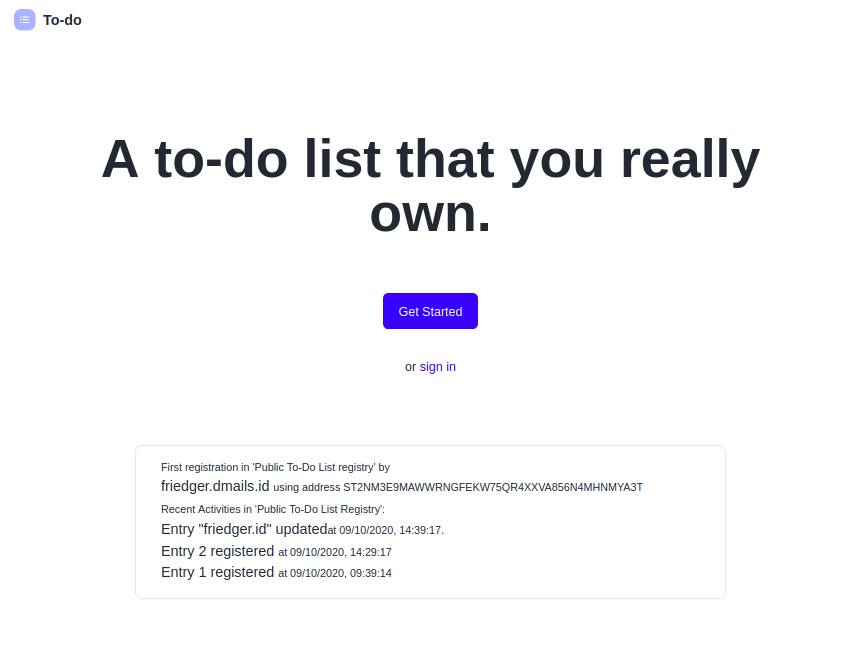
{ firstRegistration && ( <> <Text fontWeight="500" display="block" mb={0} fontSize={0}> First registration in 'Public Todos List registry' by </Text> <Text fontSize={2}> <a href={firstRegistration.url}>{firstRegistration.name}</a>{" "} </Text> <Text fontSize={0}>using address {firstRegistration.owner}</Text> <br /> </> );}Congratulations. You just called read-only functions and map entries from the public registry, without managing a server.
With the completion of this tutorial, you:
- Observed the progress of transaction processing
- Consumed APIs to show recent transactions, data map entries and read-only functions
- Experienced serializing and de-serializing Clarity values
The full source code and smart contract code for the public registry is available at blockstack-todo-registry.